When I joined the project at the beginning of term, Alessio and Maciej had already been hard at work on the concepts, theme and structure for the entire Summer break. I was really impressed with all the effort which had gone into the beginnings of this game. They were in need of a modeller to help them make almost the entire level. Even though I primarily wanted to get into character modelling, I thought the style of the whole level could help me hone my skills in areas I hadn't practiced in a while.
I joined the project as simply the modeller and texturer. They already had a firm grip on all story, themes and gameplay, and I didn't want to interfere with their idea and was happy to just do the building of their designs.
I had to first get an idea of what kind of model style and texture style they wanted. They wanted it to be fairly low-poly, and being a VR game then it probably wouldn't run well if all the models were too complex. For the texturing they were easy. They didn't want too complex or realistic textures as that wouldn't fit the overall aesthetic or poly-count probably.
My first role was to look into how to texture the game, what the overall look was going to be. Because the poly-count would end up being similar to MOBAs I thought perhaps I could replicate a similar hand-painted look to League of Legends or DoTA2. I spent a time researching how they do the DoTA textures and luckily there were handy guides on the website for the whole process.
After a few days however, I finally tried the VR headset for myself, having never had a proper play on it before. After that session I came to the realisation that the DoTA texturing wouldn't work. All VR games a pretty low-poly and low resolution textures in order to run at 90fps. Plus with the game we are doing being in 1st person, it wouldn't be practical to have bespoke hand painted textures for everything. Most of the objects are very large in-game and so the textures would look really blurred and low resolution if we did it that way.
After that day of realisation I suggested that most likely all the textures would need to be tileable because of the large amount of buildings, cave walls and different structures. They agreed and so I looked into the best way of creating and mixing multiple textures. Luckily, the student version of Substance Designer had just been released and it would be the perfect way of doing what we needed.
So I decided to learn Substance Designer. I spent a few days learning how to do as much as I could about Designer. I had a few practice efforts and with the help of many good tutorials from Allegorithmic and Digital Tutors I started to get the hang of it. Now, Designer is very good at creating realistic-looking textures as all the examples I had found were of that style. I had not found any tutorials however on how to create more stylistic, low-poly looking textures. So I had to experiment using the techniques I had learned from the realistic texture examples mixed with a bit of common sense. For instance, when using a complex, busy noise node it can create a lot of fine, high frequency detail which gives that realistic look. So to keep it simpler I could either omit that noise, edit it to be much more simple, or just pick one with much more uniform shapes.
My first proper stylistic textures turned out really well. A fantasy stylised brick, a fantasy moss and a chunky cracked paving:


With the learning of Designer going well I now needed to figure out how I was to blend these textures together on a single mesh. After going through lots of options I decided to use in-engine vertex painting.
Now, Unity doesn't come with one as standard like Unreal does, so I looked around for a free one we could use. I found a usable free one to import and use in the scene. The Designer textures would already allow us to blend them together using the height maps, but now we could paint the areas we wanted in engine.
I used the first building model I had made, complete with UV's to test the tool with the Substances in engine.
This first one is me just playing around with the texture vertex painting of two substances:

This second one is me using the height map as well as the vertex paint to create some cool effects.

Another benefit of Designer is that it is completely non-destructive and editable. So I can set these textures to use the resolution the engine sets as well as go back and edit anything I need that might need to change during the project.
So with a solid plan on how to texture the entire scene completed, I could move on to getting as many models done, so Alessio can start populating the scene.
In the summer, Maciej had already done a full greybox of the scene, so I didn't need to do that. This is the whole greybox he did:

As you see that probably took a while. This is the second version. It was so good that he did this because it would have taken so long to build this level effectively twice.
My job was just to get as many of the initial base meshes done as I could and I made them every time Maciej gave me one of the concepts. Below are all the concepts followed by my meshes that we currently have:
Player:
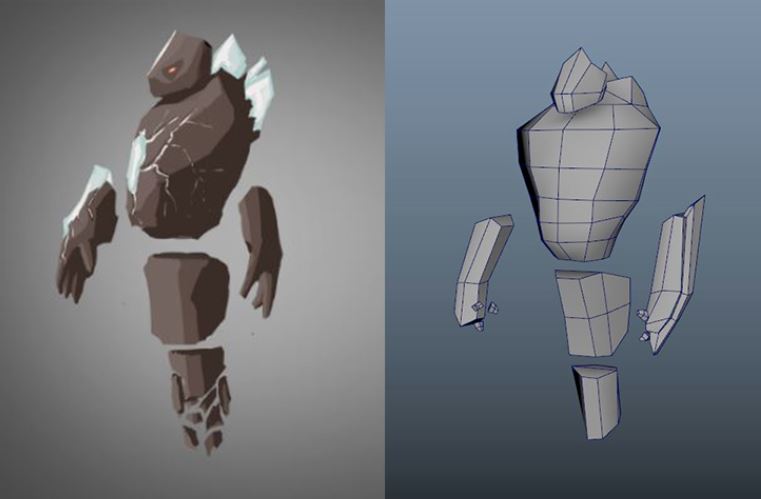
Enemies:


Buildings (all of these will me modular, and many will have more than one material to easily tile across them):


NPC's:


After these were done I still had to make sure I had enough textures for all the environment. After a team meeting the others had decided they really liked the Substances I had already made but wanted me to change the palette. So Maciej gave me the palette he would like me to use and I went about using the power of Designer to go back and edit the textures I already had.

Then I was told that ideally there would be a lot of rock and sand type textures so I went about creating a those in designer and refining the current brick, paving, plaster & moss that I already had.
So after I had finished these we had 6 usable Substances for the Alpha to look fairly populated with colour. Here are the 6 I created with the graphs underneath:


I had only one more pressing objective to complete and that was to put a use to this rock texture. The level is set within a giant cave and so the whole thing would need to be modelled as just using a skybox wasn't what Alessio was looking for. I figured out a way that might work to create the shape. I asked Alessio to place rocks where he wanted the open area to be then I could quad-draw over it to make it a single, more simple mesh and then turn the normals inside out.
It was a really fiddly job which took longer than expected and will most likely need to be optimised heavily. This was the result, its quite hard to see inside:

So my alpha stage is almost complete. All models are completely altered to be a little a-symmetrical and wonky and have full UV set so Alessio could start populating the level and trying out the substances where he wanted them. No doubt in the next stage we will have to heavily optimise.
I imagine there will be a number of models that need altering a bit and I imagine the Substances may need to be edited because with the whole level being tiled and vertex-painted then it could effect performance. Luckily substance allows for dynamic resolution altering, so they can be dropped easily to get what we need. If necessary we may need to cut down on the amount of materials and textures in the scene and even in extreme cases just remove the normal maps altogether to preserve some memory.
That is all for Beta though, and so far I believe it doesn't run too badly considering there wasn't too much attention paid to optimisation.
So far this term I have learned quite a lot, most of the things are technical rather than conceptual. Last year I only did character modelling and that is a very different process to large environments. This term I learned about good practices to use multiples materials on large object to keep texel density as even as possible. I learned the concepts behind multiple UV sets, vertex painting, multi-material mixing etc and when it could be useful to use each.
So far the biggest thing I've learned is how to use Substance Designer. I've never used a node based editor before but seem to have got the hang of it fairly quickly. I have included a step by step texturing flow in the Art Bible for reference. Substance Designer is really a useful bit of equipment and will likely use it for many things in the future, including making my own tiling textures that I can use in Substance Painter when I go back to doing characters.
No comments:
Post a Comment
Note: only a member of this blog may post a comment.