Wednesday 3 May 2017

Illara (Resurface) - Beta Development

After the end of the alpha stage, things continued on just as before for me. It was apparent at this stage that the help which was suggested to aid with the modelling and texturing duties wasn't going to materialise. This meant I had a lot of work to do and I would need to save time where ever possible. This was the point where I was glad that the VR game would require low poly assets and also glad that our previous decision to include mostly tiling textures using Substance Designer.

We continued as a group the same pattern, Maciej would design, I would model and UV then Alessio would implement into the engine and do the coding. I went through all the designs as they arrived on Trello. For all assets, except characters, enemies and plants we would be using the tiling textures with vertex blending in Unity to give them their variation. This was important because the scale of most things in the scene are very large, so had to treat almost everything like it was terrain in any regular game.

At first, I overlooked the importance of consistent texel density. There are many large models, and for the first few models I made, I didn't UV to the correct scale which meant going back to make sure they all had the same texel density. This was so we could apply a texture to any object and it wouldn't look stretched or pixelated. After unwrapping each UV section of any object I would rescale the UV's well above the 0-1 space so they naturally tile. I would also make sure that the grid squares always matched to the texture density so if two separate objects were adjacent with the same texture, they would appear the same resolution.

After these technical parts were decided, the next part was to model many low poly assets and create a large enough library of tiling textures in Designer to give Alessio enough variation when painting objects with the vertex painter.

First it was buildings and statues. Pretty straight forward. Make sure they don't have many straight lines, add variation and random kinks to the corners, bevel only when necessary to change the silhouette enough. Keeping in mind that this will be a very large level in VR so overall poly-count will need to be low.


Next was all the random additional items to add to buildings and streets to populate them (market stalls, flags, destructible walls, railings etc). I had decided to do all these props separately so they could be copied and placed in engine to customise as they went, hopefully saving time for us all in the long run. These were designed so that any texture could be applied to them and it would look fine.


Most of these smaller objects were easy and didn't take more than one iteration in most cases. The ones that took the most time was the actual terrain. The main city platform, the huge cave model with branching mines, beach cave, bridges all had to keep being constantly re-moved and updated through the development process. For instance I had already created the cave and completely UV'd it and basically had to do all of it again which was a huge amount of time lost. So at that point, all large objects that may need multiple iterations I decided not to UV right until they were definitely not going to change anymore. This had the benefit of not wasting more time, but also was hard to visualise in engine because all the textures were messed up on them. In the end though I made the right decision, because I had to change some of these models countless times. Some were even removed entirely.

The images are hard to see in Maya because of the scale of the level. A much better demonstration can be experienced when playing through the level.


After the smaller objects were done, and while simultaneously making changes to the environments, I spent my time creating (probably too many) textures. My reasoning behind making a lot was because I was a little paranoid that the environment wouldn't have the required variation when left with only a few textures in such a large space. I started with many rock variations as pretty much everything is made of rock! I thought it would be useful to have a few quite different types so every object doesn't look like it's made of the exact same material.

I already had a few textures done from the alpha, which after some texture testing in Unity I thought were a bit too dark and oversaturated. The Substance Designer viewport is nice quality but often is more washed out than in Unity for some reason. I also edited the older ones as well as made a bunch of new ones. When I tested out all the current rocks extensively in my tester Unity project with the substance painter, I discovered that many were very harsh, so I decided to make a soft version of all the biggest offenders. It wasn't very hard, a bit of desaturating, toning down the height maps and making the normal maps less harsh. The good this about these is that they blend very nicely with their originals. Adds a nice bit of variety to the level.


Next was to make the more specific textures for objects. I found some particularly hard when trying to keep a more chunky, simplistic style to not become too realistic. Metal, and rusty metal were prime offenders. Also I found leather quite hard to not make too detailed, and in the end it's probably my weakest one.


The great thing about Designer is that you can have Unity set the resolution of the textures on the fly. I've put a soft limit of 256x256 on them, so that is what they import at. I believe Alessio stuck with that because they look surprisingly good still even at this lower resolution. The good thing is that if he ever has the need to just increase the resolution of the textures, he just has to change a couple of parameters in engine, and they will all update. A very nice compatibility feature of Unity and Substance.

After these were all done, I cleaned up the Substance graphs to cause as little computation as possible in engine, and only had output nodes that were strictly necessary: Albedo (with height map as the alpha of albedo because the vertex painter reads the height in this way for the blending), Normal and Metallic (with Roughness as it's alpha).
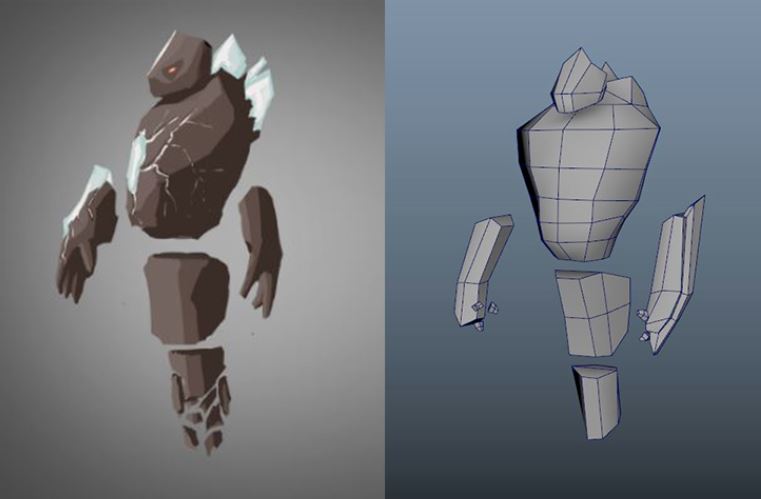
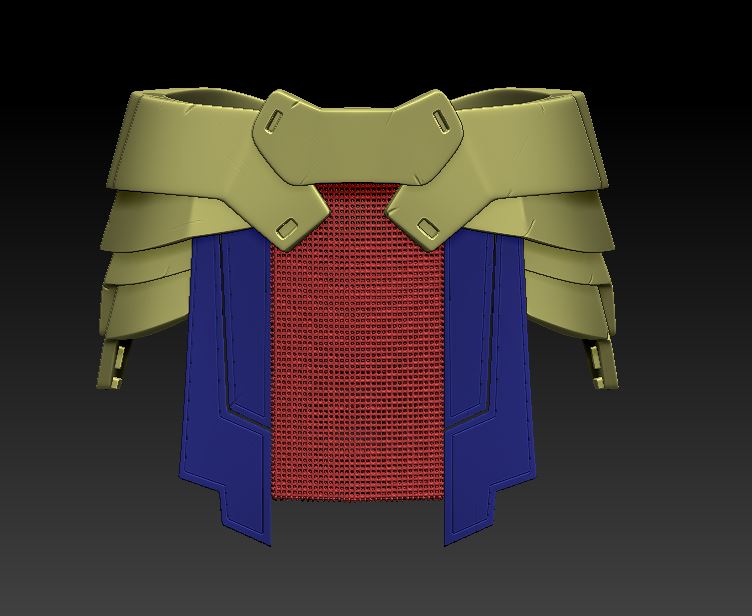
My next task was to finalise all the character and enemy models. I had to go back and fix them up and UV them properly so they could be implemented into the engine. Easy enough task, just time consuming.

Then the player 'arms' needed to be implemented properly so I had to fully model them out, as they would be in front of the users vision the whole time when playing, and also would have UI elements attached to them so needed to be implemented sooner rather than later. Because of their prevalence in the scene, and proximity to the camera, these would need to be slightly higher poly-count that most other things in the scene.

I initially had a lot of trouble trying to model these out in Maya. Even with decent model sheets, it was hard to properly visualise the shape, and they were just high enough resolution for it to become a confusing and inaccurate mess. After a few attempts at doing some different methods I ended up going into zBrush to do them. It was really easy in zBrush and wish I had done it sooner. I'm much better at sculpting the more complex shapes in there, I find it easier to visualise. When I got the shapes correct, I simply dyna-meshed the poly count down to an acceptable amount then did a few decimates until the poly count was really low and the geometry was all triangulated and chunky. I then imported them back into Maya to do the UV'ing.


Next was the character who will guide the player in the form of tutorial messages: The Shadeling. Now, this guy doesn't have traditional textures but was going to be particles effects all done by Maciej. He was new to doing particles and I was new to setting out UV's for them so this took a few iterations and back and forth to get the UV's in a shape where the particles and scrolling textures he was using looked normal. This ended up with the model being very basic with essentially just floating planes, but appeared the best way of making it look ok when animated.


At this point, I was pretty swamped with quite a few models and textures to finish up and so I had to source some of the model making to Maciej. He said he could do the plants because they hadn't even been started. So the only modelling I didn't do for the project was the plants. He would model and UV them and I would texture them. Probably should've been the other way round considering he's the artist! But, he had trouble using the painting programs so I said I would do that as I could easily set things up my end, and then the textures may look more in keeping with the rest of the level as well.

While he modelled the plants, I started texturing all the villagers and enemies in Substance Painter this time. Initial tests with only tiling textures on the characters looked pretty bad in engine and needed additional details to not look so flat. So I had to re-arrange the UV's (again), the rock parts of their bodies would be one sheet and one material, the clothes and accessories would be another sheet but various materials. I had to make sure everything was given the correct materials before importing into Painter.

For each character, I imported the model (only low-poly because there is no high-poly for baking) I would then bake the only maps I was able to in Painter. The most important of these were the position map and curvature map. These would help me add interesting dirt masks to gain that additional detail the models were previously lacking. I first gave the models one of the selection of my Designer textures I had previously made. They are fully compatible between programs so this was easy. I added different rocks or material for each part of each model trying to keep to Maciej's original design as much as possible. I then added ground dirt or edge wear type masks to give them a slightly more 'real' feel than everything else in the scene.

I tried to keep these details and minimalist and simple as I could without looking like they were painted on and also without looking too realistic. Because of just how low-poly the models are, they are in no danger of looking overly complex with the level of detail I gave them.

I did that with all the villagers, and also all the enemies too, with a very similar process.


Next, the plants were modelled so I could texture them too. First I had to do a bit of UV cleaning up, getting rid of distortion and maximising the space available, and bit of adding smoothing groups too. Then I did the same process in Substance Painter as with the characters and enemies, but this time keeping the textures all on one sheet. Each character is 2 sheets of 512x512. I kept the plants and trees the same, only the smaller plants were 256x256 instead. I stayed as exact to Maciej's original concepts for these plants as much as I could, I think they turned out quite well, and quite accurate to the originals.


After that was a bunch more fixing random things: resizing platform elements; making variants of railings; decreasing slope intensities; changing bridge dimensions; adjusting the puzzle height on the door; changing and resizing some of the cave and mine layouts etc. The list goes on...

Finally I had to model the menu. In VR, the menu is often a physical space instead of a 2D pop-up and so the menu would be a collection of objects to be interacted with. In our case we have a smaller cave which the player stands in, then plinths and shelves which have objects which can be moved and placed in the necessary areas. Easy enough to build, and using the same texturing technique as all the other geometry.


Only a few more fixes occurred after that for me, little ones here and there. To be clear, I pretty much stayed away from all engine responsibilities in this project. I made the models and textures and made everything as easy as possible for the other two to implement. All level design and arrangement, even vertex painting has to be credited to the other two who primarily worked within Unity. I think we found it developed naturally this way, it is easier to organise and manage when there is only 1 build being shared between two people rather than three. Even though I would have liked to have a bigger input when it came to placing all the objects and the level 'set-dressing' I had too many other things to edit to be able to put in enough time when it was required. I also would have liked to do more of the vertex painting of the level. I mean I did all the preparatory parts like sourcing the vertex blender and creating the textures and didn't get to do the most fun part.

During the project I had a solo 'texture tester' Unity project which I then transformed into a bit of a demo scene to show some images for the portfolio and blog. Because of their low-poly nature, they look much better in engine than being shown off in a render compared to higher-poly models.


In this project I hadn't really learned a whole lot compared to what I wanted. I originally joined the team as a character modeller to specifically enhance my ability to create higher-poly characters. As the project progressed, the poly-count got lower and lower and my duties became further and further from what I originally envisioned. These factors added up to me not gaining much from what I wanted, but I did learn some skills which I didn't think I would be needing, all useful skills when it comes to setting up environments, especially in terms of texturing.

I did learn about texel density, which doesn't apply as harshly when making characters compared to huge tiling environments and terrain. I did it in a bit of a 'home-made' way so I didn't discover a good 'universal' way of using it in a project like I would need to if I was working alongside other environment artists.

I learned a neat trick of the transpose random variation in Maya. Nothing major, but very useful to creating uneven surfaces and randomising the vertices of objects a little to give them that 'wonky' look without having to edit them all individually. I did actually discover that nearer the end so the the majority of the level was done manually unfortunately.

Another small thing I learned was how to UV with particle effect animators in mind. This does apply to character and will be something I bear in mind in the future. For instance this must happen a lot in action RPG's, MOBA's etc. which have a lot of particle effects directly around, and on the the characters clothing.

The most significant thing I learned by far was how to use Substance Designer, as that will be useful whatever I go on to do, especially environments. I had a bit of trouble keeping the textures to a more simple style. Making realistic textures in Designer is much easier than one would think and trying to keep the variation just enough to not be boring, but not enough to suddenly seem like it could be a real surface. The smooth metal I made, and the rusty variant were the perfect demonstrations of this. If you add small striations and a bit of surface noise, put 'metallic' value to full you basically have a real looking metal. They key was to limit the noise and reduce the metallic amount. Even though it is pure metal, reducing it down to 60-70% or so makes it feel just 'off' enough so you can tell it's metal but doesn't look realistic. The rust was by far the hardest and I don't think I managed it. Rust will just look like dirt if it doesn't have that speckled variety, but it was just way too easy to make it realistic looking. I think the one I ended up with still does. I tried reducing the noise and blurring the edges to keep the colours and shape without all the tiny noise detail. I don't think it works that well, and it probably just looks like weird blurry rust.


Most of the others I managed to straddle the line enough to stay within the style and I'm pleased with some of them and the way the environment turned out as a whole. I think it looks quite good considering all the structures and terrain are very low poly for their size and every environmental texture is only 256x256. I think it looks way more detailed than it actually is, which for me personally, was the entire goal of this project. I tried to make a large level that would look quite detailed and not too blurry close-up and still be able to run in VR. There is definitely further testing and optimisation to do as it doesn't run as well as we'd like. I'm fairly sure with further optimisations and refinement this technique could make it a viable one to use on larger VR levels like these.

Some more of the characters and plants in engine:


Monday 28 November 2016

Resurface - Alpha


When I joined the project at the beginning of term, Alessio and Maciej had already been hard at work on the concepts, theme and structure for the entire Summer break. I was really impressed with all the effort which had gone into the beginnings of this game. They were in need of a modeller to help them make almost the entire level. Even though I primarily wanted to get into character modelling, I thought the style of the whole level could help me hone my skills in areas I hadn't practiced in a while.

I joined the project as simply the modeller and texturer. They already had a firm grip on all story, themes and gameplay, and I didn't want to interfere with their idea and was happy to just do the building of their designs.

I had to first get an idea of what kind of model style and texture style they wanted. They wanted it to be fairly low-poly, and being a VR game then it probably wouldn't run well if all the models were too complex. For the texturing they were easy. They didn't want too complex or realistic textures as that wouldn't fit the overall aesthetic or poly-count probably.

My first role was to look into how to texture the game, what the overall look was going to be. Because the poly-count would end up being similar to MOBAs I thought perhaps I could replicate a similar hand-painted look to League of Legends or DoTA2. I spent a time researching how they do the DoTA textures and luckily there were handy guides on the website for the whole process.

After a few days however, I finally tried the VR headset for myself, having never had a proper play on it before. After that session I came to the realisation that the DoTA texturing wouldn't work. All VR games a pretty low-poly and low resolution textures in order to run at 90fps. Plus with the game we are doing being in 1st person, it wouldn't be practical to have bespoke hand painted textures for everything. Most of the objects are very large in-game and so the textures would look really blurred and low resolution if we did it that way.

After that day of realisation I suggested that most likely all the textures would need to be tileable because of the large amount of buildings, cave walls and different structures. They agreed and so I looked into the best way of creating and mixing multiple textures. Luckily, the student version of Substance Designer had just been released and it would be the perfect way of doing what we needed.

So I decided to learn Substance Designer. I spent a few days learning how to do as much as I could about Designer. I had a few practice efforts and with the help of many good tutorials from Allegorithmic and Digital Tutors I started to get the hang of it. Now, Designer is very good at creating realistic-looking textures as all the examples I had found were of that style. I had not found any tutorials however on how to create more stylistic, low-poly looking textures. So I had to experiment using the techniques I had learned from the realistic texture examples mixed with a bit of common sense. For instance, when using a complex, busy noise node it can create a lot of fine, high frequency detail which gives that realistic look. So to keep it simpler I could either omit that noise, edit it to be much more simple, or just pick one with much more uniform shapes.

My first proper stylistic textures turned out really well. A fantasy stylised brick, a fantasy moss and a chunky cracked paving:


With the learning of Designer going well I now needed to figure out how I was to blend these textures together on a single mesh. After going through lots of options I decided to use in-engine vertex painting.

Now, Unity doesn't come with one as standard like Unreal does, so I looked around for a free one we could use. I found a usable free one to import and use in the scene. The Designer textures would already allow us to blend them together using the height maps, but now we could paint the areas we wanted in engine.

I used the first building model I had made, complete with UV's to test the tool with the Substances in engine.

This first one is me just playing around with the texture vertex painting of two substances:


This second one is me using the height map as well as the vertex paint to create some cool effects.


Another benefit of Designer is that it is completely non-destructive and editable. So I can set these textures to use the resolution the engine sets as well as go back and edit anything I need that might need to change during the project.

So with a solid plan on how to texture the entire scene completed, I could move on to getting as many models done, so Alessio can start populating the scene.

In the summer, Maciej had already done a full greybox of the scene, so I didn't need to do that. This is the whole greybox he did:

As you see that probably took a while. This is the second version. It was so good that he did this because it would have taken so long to build this level effectively twice.

My job was just to get as many of the initial base meshes done as I could and I made them every time Maciej gave me one of the concepts. Below are all the concepts followed by my meshes that we currently have: 

Player:


Enemies:


Buildings (all of these will me modular, and many will have more than one material to easily tile across them):


NPC's: 


After these were done I still had to make sure I had enough textures for all the environment. After a team meeting the others had decided they really liked the Substances I had already made but wanted me to change the palette. So Maciej gave me the palette he would like me to use and I went about using the power of Designer to go back and edit the textures I already had. 

I did a few quick vertex paint tests in Unity to see if the new palette was working and the others were happy with it:


Then I was told that ideally there would be a lot of rock and sand type textures so I went about creating a those in designer and refining the current brick, paving, plaster & moss that I already had.

So after I had finished these we had 6 usable Substances for the Alpha to look fairly populated with colour. Here are the 6 I created with the graphs underneath:


I had only one more pressing objective to complete and that was to put a use to this rock texture. The level is set within a giant cave and so the whole thing would need to be modelled as just using a skybox wasn't what Alessio was looking for. I figured out a way that might work to create the shape. I asked Alessio to place rocks where he wanted the open area to be then I could quad-draw over it to make it a single, more simple mesh and then turn the normals inside out. 

It was a really fiddly job which took longer than expected and will most likely need to be optimised heavily. This was the result, its quite hard to see inside:


So my alpha stage is almost complete. All models are completely altered to be a little a-symmetrical and wonky and have full UV set so Alessio could start populating the level and trying out the substances where he wanted them. No doubt in the next stage we will have to heavily optimise.

I imagine there will be a number of models that need altering a bit and I imagine the Substances may need to be edited because with the whole level being tiled and vertex-painted then it could effect performance. Luckily substance allows for dynamic resolution altering, so they can be dropped easily to get what we need. If necessary we may need to cut down on the amount of materials and textures in the scene and even in extreme cases just remove the normal maps altogether to preserve some memory.

That is all for Beta though, and so far I believe it doesn't run too badly considering there wasn't too much attention paid to optimisation.

So far this term I have learned quite a lot, most of the things are technical rather than conceptual. Last year I only did character modelling and that is a very different process to large environments. This term I learned about good practices to use multiples materials on large object to keep texel density as even as possible. I learned the concepts behind multiple UV sets, vertex painting, multi-material mixing etc and when it could be useful to use each. 

So far the biggest thing I've learned is how to use Substance Designer. I've never used a node based editor before but seem to have got the hang of it fairly quickly. I have included a step by step texturing flow in the Art Bible for reference. Substance Designer is really a useful bit of equipment and will likely use it for many things in the future, including making my own tiling textures that I can use in Substance Painter when I go back to doing characters.


Wednesday 27 April 2016

Thanos


For the project I knew immediately that I would want to do a character. Even though in the other group project I had also chosen to do a character, this was my opportunity to choose a character to model that I had an established interest in. I knew at this point I would want to do a character that I not only had some kind of interest in, but I specifically wanted a character which was wearing some kind of armour so I would get a mix of organic shapes and hard surface in one. I chose Thanos for this because he fit all the criteria, plus with the recent Guardians of the Galaxy and Avengers films, there were a lot of high resolution CGI examples for me to take inspiration and reference from.


I gathered pretty much every single picture of Thanos I could find, from the pure cartoon early comic pictures to the new film CGI ones. I noticed immediately that the design of him and his suit/armour are pretty much always different, so I would have to choose a certain composition that I liked. I chose the main one from a recent comic example as my favourite, but there weren't many different pictures for that suit. I go into this armour selection in greater detail in my previous blog post.


I wanted to primarily work in zBrush when creating the high poly version. My plan was to use a workflow I had not used yet which I thought would be the most efficient way of working. This work flow was start in zBrush to complete the mesh shape, design into full high poly. Then I would take a decimated version into Maya and use Quad Draw to create the low poly meshes by hand and UV mapping as well. Next would be to bake the maps using xNormal, and touch them up in Photoshop. Then moving to Quixel Suite to do the texturing using a PBR workflow before finally setting up a scene in Unity to display the final model.

So to start off, I went to zBrush to create the initial mesh. I wanted to create a Thanos version which was semi-realistic and semi-cartoon, so he would need to have more exaggerated hands, jaw and muscular groups as is common to Thanos in most comics. I used zSpheres initially to get the overall shape. I was mostly doing it by eye here because I didn't have a singular reference, more just a collection of different images. I finished placing all the zSpheres and created the adaptive skin to complete the first mesh.


I then subdivided a couple of times to start general reshaping and get some muscle groups detailed in. I used the Move, Clay Buildup and Smooth brushes only for this section. I spent a while getting the initial shape of the anatomy right, trying to get that semi-real body shape I was looking for. When I was happy with an initial shape, I masked off the front of the face, inverted it and then subdivided a few more times so I could get more detail into the face. I added details for initial muscle groups, and some overall facial features until I was happy that my initial mesh was good enough to continue with.


Looking at the reference I could tell that there appeared to be an 'under-armour' type suit which would need to be detailed as well as all of the armour on top. At this stage I was trying to figure out which would be the best method to use. I had seen a few tutorials about how to do hard surface armour on DigitalTutors, a few using panel loops to separate pieces and thought the seams on the under armour might benefit from that technique. That meant poly-grouping the entire model. This was a very long process but I decided that it would be worth it if it would look like the examples. I thought I would detail all armour parts at this juncture, just in case it did look good and I could use some of the panel looped pieces as main armour pieces as well down the line.


I then panel looped the whole thing and quickly realised that the mesh would have needed to be a much higher resolution when first poly-grouping to get the result I thought I was going to get. Stupidly I didn't do a tester area first so I had wasted a lot of time here. I used the smoothing function when panel looping however and it gave me enough to try to work with for a bit. I selected 'mask by poly-groups' from the mask menu and then started to pull out the panels using a large sized Move brush to see if I could salvage this attempt by fashioning the armour areas to the correct shapes later.


I decided that method was a bit crap and I wasn't sure I could get it to look the way I wanted so I got rid of that copy of the mesh and went back to the original to try something new. Another common technique I had seen used in tutorials was the mask then Extract feature. This was useful because it was non-destructive on the original and created a new subtool for each extracted armour piece. I went round the model quickly and painted each armour area roughly on the mesh and then extracted each bit. This appeared to work a little better so I continued and covered the whole mesh. I knew these sections would need a lot of work later on, but for now they seemed good enough.


After a break and some more reference studying I had decided that the anatomy was wrong, I needed to make it slightly more realistic. I wanted it to be more like a human body-builder rather than a cartoon body shape. I also decided that the head and face needed a bit of work. On top of this, I had once again decided that the armour looked crap and I would need to find another method for making the pieces the correct shape while still looking like hard surface. But before the armour again, I would need to reshape the anatomy. I made the head longer and thinner and made the jaw less pronounced. I lengthened the legs, to put them back into realistic proportions. I also lengthened the arms and made the hands smaller. This was more on the realistic side now but still unrealistic enough to remain a bit comic-like.


Next, I wanted to try and stick the anatomy and face more to the main reference image I was using. In the image, Thanos' jaw is uncharacteristically narrow compared to almost all other depictions of him. I decided to try and make the head and face shape much more like that version and began to sculpt the details so it would resemble that a bit better. I made most of the facial features much more narrow, narrowed the eyebrows and cheekbones, made the eyes less rounded and the jaw and chin much thinner.


When I came back to the model the next day, when I first looked at it I realised he now looked far too human. Even though the reference I was using made him look fairly human, I decided again to swing the other way slightly and change his head shape and facial features to be almost like an exaggerated human instead. I re-widened his head, jaw and chin, but kept his eyes and nose small. Finally I was happy with the way he looked facially. I had the balance between reality and 'comic-ness' as it was in my head. I put some little more little details in like some rough eyebrows and and eye folds etc.


I also wanted to reshape his body again to go with his new head. I modified it all a little to try to create the same semi-real look I was aiming for. None of the body anatomy would even be shown in the final model, but I wanted the underlying shape as accurate as possible so I could more easily replicate how armour might actually sit on top of the figure.


I decided to try the extraction technique again for the armour so went through the same process and blocked out the armour pieces roughly. I then positioned them in the correct places without spending too much time trying to complete any of the individual pieces.


I thought it all looked ok for a base, so I then repeated the panel looping technique this time only for the under-armour parts.


On the tutorial videos I had watched, they showed a lot of techniques for moulding hard surface shapes using Trim Curve combined with Dynamesh and then using the Flatten and hPolish brushes to get the desired final look. I just couldn't get this to work with these extracted pieces at all. The topology was so messed up on these parts that even the combination of Trim Curve and Dynamesh wouldn't make the edges sharp enough. I even tried using zRemesher on some parts when they were close to being the right shape in hope that it would give me a usable topology but instead just changed the shape of some of the pieces way too much. It was all becoming very unmanageable and I was very close to doing these armour pieces in Maya.

Determined to not go back to Maya so soon, I researched many more tutorials for other hard surface techniques until I found a very interesting brush combination I had not seen before. The first was the Topology brush. To use this, you draw lines across the surface of the mesh in a typical check pattern. When you tap the pen again, it creates low-poly geometry in quads of the size that you drew (the more lines you draw the more subdivisions you get). The advantage to this was that I could get the hard edges I needed and the correct topology of the armour pieces. The disadvantage was that the shapes were no longer accurate to the armour so would need work to get it the right shape. This is where the zModeler brush comes in. With that brush you can use all the standard geometry tools from other programs on your zBrush geometry such as, extrude, edge loops, moving vertices, creasing edges etc. So with those two brushes combined, I could draw on the shape of an armour piece, create a low poly part, modify it to be accurate with the reference, add edge loops where I needed and then crease the edges which I wanted to stay sharp before subdividing. I then went through and replaced all the extracted armour parts with the new low poly versions. It took a long time but I think it was worth it, it looks much better like this.


With all the armour pieces in the correct place, I could start adding details. I could now subdivide each part many times and lightly smooth the creased edges so they remained looking hard surface, but more natural. With the softer 'hard' edges this also helped to give it a more comic book looking feel as well. I added the four different parts to each finger, shaped them into the correct form overall and left them until after they were copied. I started also adding large details to the armour pieces, indents and such. The references weren't so detailed in many of the places I needed them to be so I had to be creative and add details I thought fit the theme. I did these mainly by masking and area, sharpening the mask, inverting it, then either pushing the area in or pulling it out. For some I used the transpose move tool to get a clean direction and for some I used Inflate/Deflate in the deformations menu instead.

I also used the slice curve tool and made subtle panel loops on some areas and pushed them in while masking by poly-groups to create finer details. I continued this over the whole model until all armour pieces were high poly and detailed.


For the mesh part I just used a very low poly box and added surface noise to it to create the look of mesh. I would subdivide it and bake that detail in just before decimation.


To be completely done with the high poly I needed to add all the extra details which would make the detail in the normal map. I subdivided the head up to about 7 million polys and cut in more wrinkles with the Dam_Standard brush. I also turned symmetry off at this point and started changing the expression a bit to make Thanos asymmetrical. I gave him a much larger grimace as well, as I think it fits his character better than to have a neutral expression. As this character's face won't be rigged and animated, it would be good to give him an expression now for the final presentation. I added lots of small wrinkles with some stock alphas and tried to replicate some of the creases of the lips and around the eyes. I also added some pores to the centre of the face, but I may have over-done the detail. It looks fine from a distance but looks a bit strange up close.


I also added a bunch of asymmetrical scratches and armour damage. Nothing too detailed, more like the larger chunks cut out of the corners that you see a lot in Pixar films and other more cartoon-like films and games. After that was finished, the high poly was done!


Next came Quad-Draw in Maya. I had recently finished the very, very long Quad-Draw process for the Golem I did in the other project, and I thought that this model may be slightly easier, as most of the details should be normal map rather than geometry. I was wrong! It took ages again, so many nooks and armour edges that needed to be fully modelled out as geometry. The hands and legs especially took a long time. The finished 'low poly' mesh was 39k polys, so that means I had Quad-Drawn out almost 20k by hand. Even the face was asymmetrical so I had to re-organise and relax both sides of that. It took a lot of hours to complete, but was worth it in the end I think.


The next stage was to UV map the whole thing. I wanted the most resolution reserved for the face and eyes. I also wanted more for the chest than the legs. I was planning to only need two 4k maps for the whole thing so the head, torso and shoulders on one and arms, legs and skirt on another.


After positioning the maps all very carefully, to maximise space, I realised that I left the shoulder UV's off the screen and so needed to give them their own sheet annoyingly. It wasn't too bad in this case because I could easily use a 1024 map for them.


Next step was to do colour IDs and do some trial maps. I had purposefully separated the legs, arms, skirt, torso, head and shoulders into different parts to get a much better bake. I had previously completed the Golem for the group project and had done many trial bakes to get the best results and noticed where the bleeding was, so tried to minimise that for Thanos.


While making the colour IDs in zBrush, I realised the skirt chain mesh part wouldn't dye the full colour I set it to. I did a quick export and trial bake in xNormal to see if it effected it, and it did. I needed to change the approach without modifying the geometry shape. I remembered that I had watched something about MicroMesh a while ago, so I hunted down the tutorial to see if I could apply it here instead. I took the subtool down to its lowest subdivision and used the zModeler to manually even out the topology so the MicroMesh could work evenly. I wanted to make a mesh-like chain part which repeated so I created a small hatch pattern with low poly geometry. I then merged and Dynameshed them to create the smoothed out corners.


After I Dynameshed them, I lowered the polycount to as low as I could while still retaining the shape using zRemesher, then saved the zTool. I then selected the subtool that I wanted to use the Micromesh on and applied it to the skirt area. The Micromesh came out quite well, even though that piece was quite high resolution now, it was good for exporting as the high poly. Plus, the colour ID remained the same throughout the mesh it which is what I wanted.


Next I baked all the maps in xNormal, I only had to do each part of the model once, as they are all in sensible small pieces. After the bakes were complete, I took the low poly OBJs into Unity to test to make sure all the normals, colours and AO were all looking correct. I was surprised how good it looked even with a simple light source and no textures. I then went over the model and opened up the maps in Photoshop simultaneously and when I found a spot which looked funny or was incorrect, I modified it by hand to fix the problems. I could've spent all day doing this as there were so many little overlaps when you zoom in close. But I stuck to prioritising the biggest culprits and fixing them only. 


It was at this stage where I realised I had made a huge error. When making the low poly I had intended to match up the vertices so when the maps were baked, I could do back and attached most the pieces to the same mesh. That's when I realised that I had overlooked that I couldn't attach the arms to the torso because the maps were on different sheets. I wanted to rig and pose the character for the final screenshots but with all these gaps in the mesh it would not be possible. I decided to make some 'underskin' to fill in the holes so it wouldn't be possible see through the mesh when the limbs moved. I took the original mesh I had made in zBrush and cut out the necessary bits, merged them and exported into Maya. In Maya I optimised them a bit a stuck them on the UV sheet with the shoulder pieces. I planned on making them the same colour as the rest of the 'under armour' so they wouldn't really be visible.


The next stage was to take it into Quixel to texture. This part was difficult, because I had to find the balance between realistic and cartoon textures. So the skin I had to make slightly less shiny than usual. I had a few examples of the type of texture 'realness' I wanted to replicate and I noticed that a lot of the textures were quite similar. Most looked quite like they were some form of rubber, even the metals. So I wanted to be careful not to pick realistic textures, or if I did, then dial back the gloss so they appeared more rubbery. The skin and the rubbery looking purple armour pieces were ok, but the gold metal was very difficult. Too much in one direction and it looked like plastic or rubber, and too far in the other at it looked too realistic. I spent a long time tweaking the settings in the 3Do renderer trying to get it to look good in all different light settings. I was happy with the result I got and so it was time to export to fully view what it looked like in-engine.


First though I exported the maps to normal PBR so I could display them in Maya with the Stingray PBS shader. Looks ok even with the standard viewport 2.0.


My plan was always to rig and pose the model to display in engine, This is the main reason I had done so many pose studies in my sketchbook. Due to a crazy few weeks personally for me, I didn't have time to fully complete this section so I had to leave it out and just import the model as it was into Unity.

Due to these same time constraints I didn't really have time to learn and set up a whole Unity project with good lighting and environmental effects, so for this I used Unity's own The Courtyard demo project which is free to download at: https://www.assetstore.unity3d.com/en/#!/content/49377 

I modified it a bit, deleted some parts from the scene where I wanted to display Thanos, as well as removing all the unnecessary objects from the scene, and also some functionality. I then moved some more lights into place quickly to show Thanos a bit better. The scene is particularly useful because it has a day/night cycle worked into the build. I included a controls.txt in the build folder for how to change lighting, remove HUD and pause/modify the day/night cycle.


I then captured some final images in scene. Annoyingly, they still don't look as good as the Quixel Renderer! 


I learned loads of different skills during this project, primarily to do with hard surface. I was a bit annoyed that I spent so long re-doing the entire armour set 4 times over. This wasted time early would have really been useful later on, because it would have given me more time to rig and pose the character. Having said that, I learned so much about hard surface modelling in zBrush now, I even know the strengths and weaknesses of each method having pain-stakingly experienced them first hand.

I also learned a bit about high-poly facial modelling as I watched a tutorial from artstation.com  about a guy who did a high resolution sculpt of Judge Dredd. He took his face up to 12 million polys to do the high resolution creases and details. He showed a few techniques and brushes he used which I tried to replicate. Brushes like Dam_standard, and Standard with some of the alphas to get creases and pores. My face ended up at about 7 million, so not as high res, but good enough to show the details which came out really well in the 4k normal map.

I made a lot of mistakes during the project, many with the anatomy shape and armour which I resurrected along the way. I was really annoyed with myself on two of the later mistakes however. First was missing out the shoulders from the UV sheet. I could've changed it, but it would have taken a fair amount more time and I was happy with the resolution of all the pieces I currently had. The second and probably biggest mistake and regret was not originally putting him in a T-Pose. This caused the gaps in the areas where the meshes connected of the armpits etc which I then had to make a work-around for. If I had originally put him in a T-Pose when doing the very first steps of the zSpheres, then I could have avoided that problem. I still would've been able to cut the meshes to bake them as separate parts, but then they would have perfectly connected together again and I could've rigged it easily. The other thing the T-pose would have helped with is the Quad-Draw of the hands. It was a bit fiddly in the current position and just would have saved some time.

If I were to do this project again, I would start in a T-Pose, sculpt a low resolution rough out-line mesh of the body to use as a base. I would then create a very high resolution head and neck, also to use as a base. I would also add ears too, so I had the option of displaying him without a helmet. I would then make the armour in 2 ways, first, for some bits I would use the Topology brush, like I did with the 4th and final attempt. The other bits I would use simple cubes which I would subdivide then Dynamesh, position them in the correct places and use the Trim Curve and Polishes to get the right shape, similar to how I did the finger parts at the end. I would make sure the armour and base mesh stays as separate meshes and try to keep them in separate chunks for exporting to Maya. The positives to this would be that I would animate it all separately, so the armour would move properly like hard surfaces should. Also it would take less time to Quad-Draw as it wouldn't have so many fiddly areas. The downside to this is that there would be slightly more poly's but I think the fact that it would look more professional in terms of less bake bleeding, and the fact that it could be properly rigged and animated would outweigh this negative. In terms of baking and texturing, I think my process was fairly good and didn't have too many problems. My high resolution mesh baked well on to the low res mesh. The only slightly downside from the final stages was the fact that maybe the gold metal I used was slightly too shiny still. I could easily edit that now, but no time to re-capture all the pictures and things. The gold armour looked less shiny in Quixel compared to Unity, so I should have gone back and edited it slightly. Overall though, I was really happy with it. It's still not portfolio quality work, but it's closer!